Friday, December 30, 2016

Christmas Card

Hello Friends...
Today I'm going to share a card, that I made for some challenges.
I took the inspiration of this card from Pinterest and here it is...


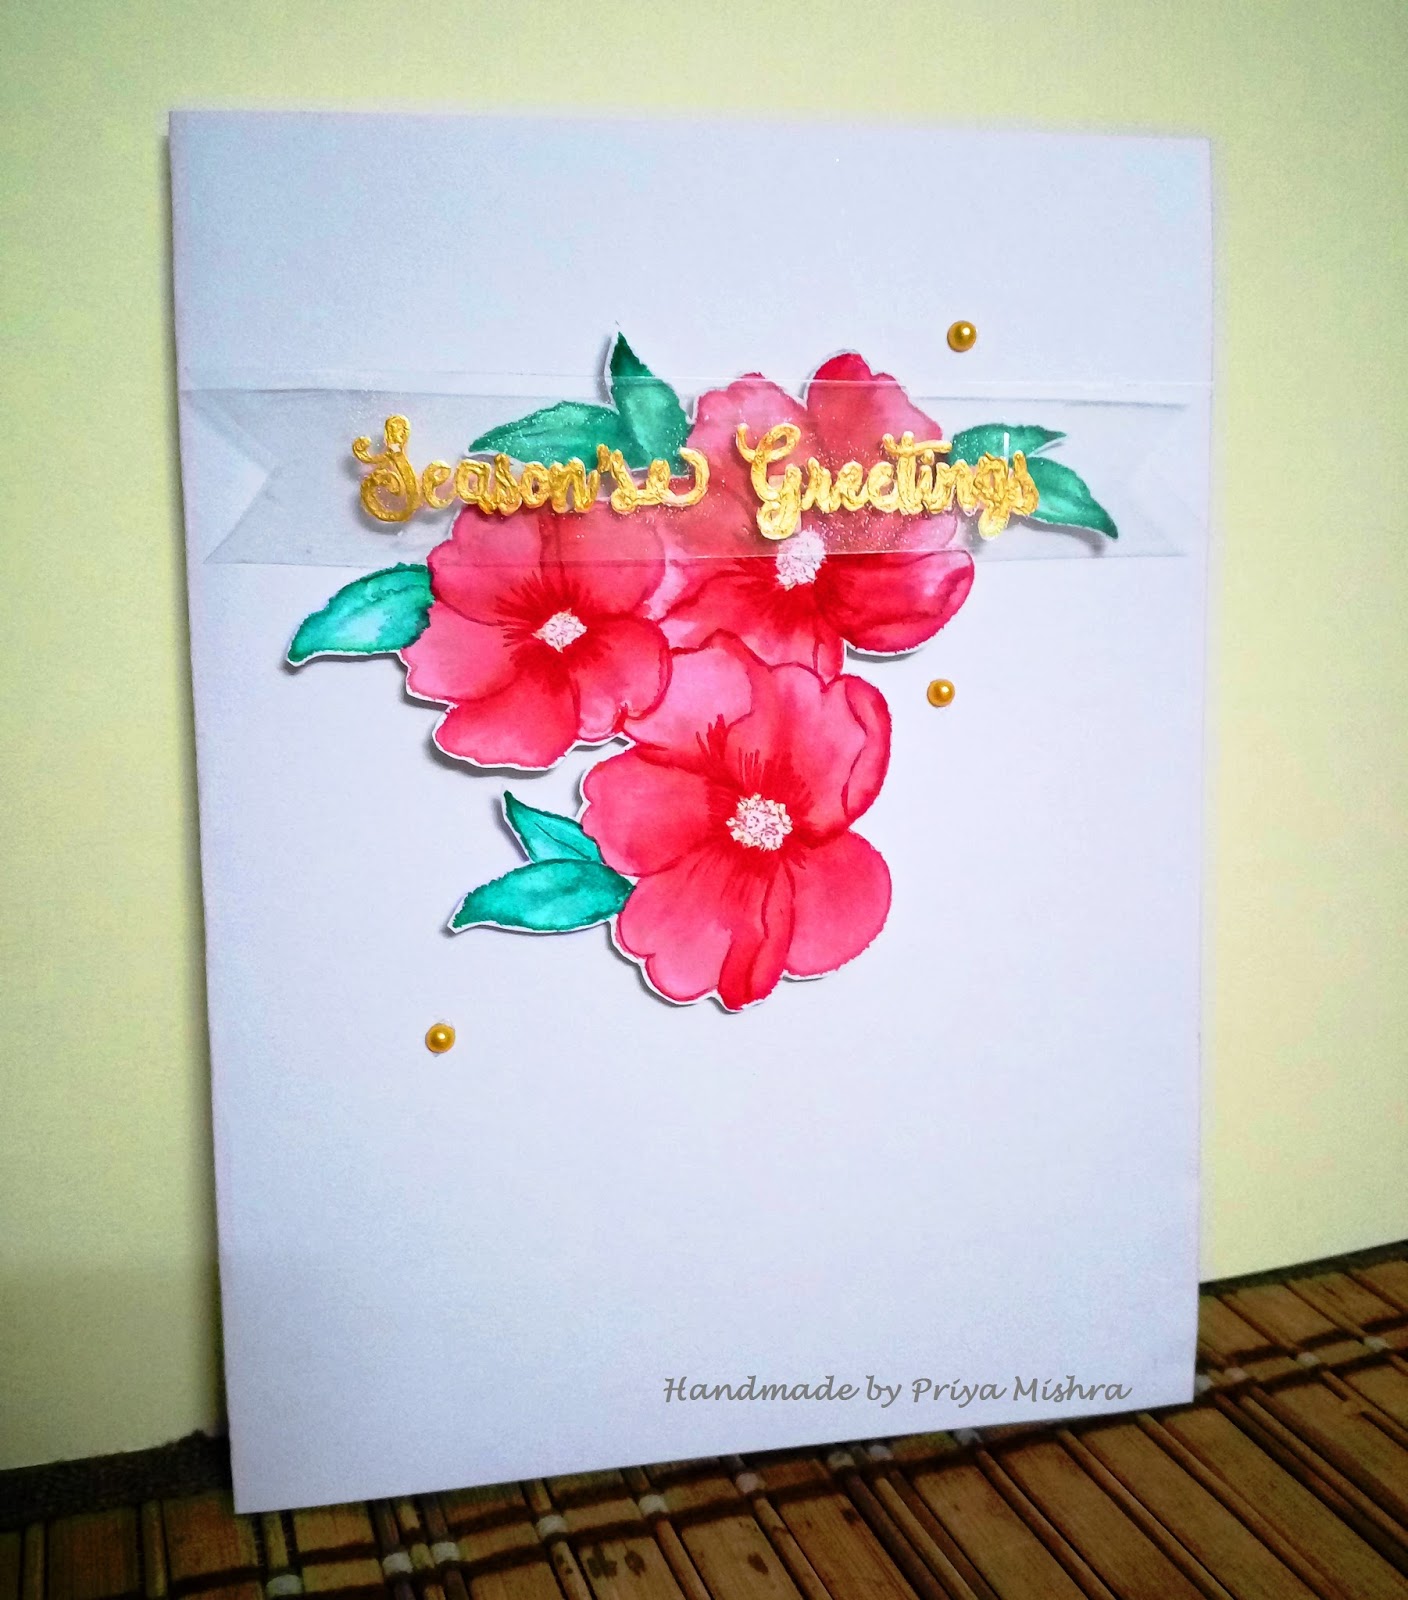
This is a 5.5"*6.6" card. I layered it with another card piece of 5"*6".
I stamped the snowflakes images using Versamark clear ink and white embossing powder.
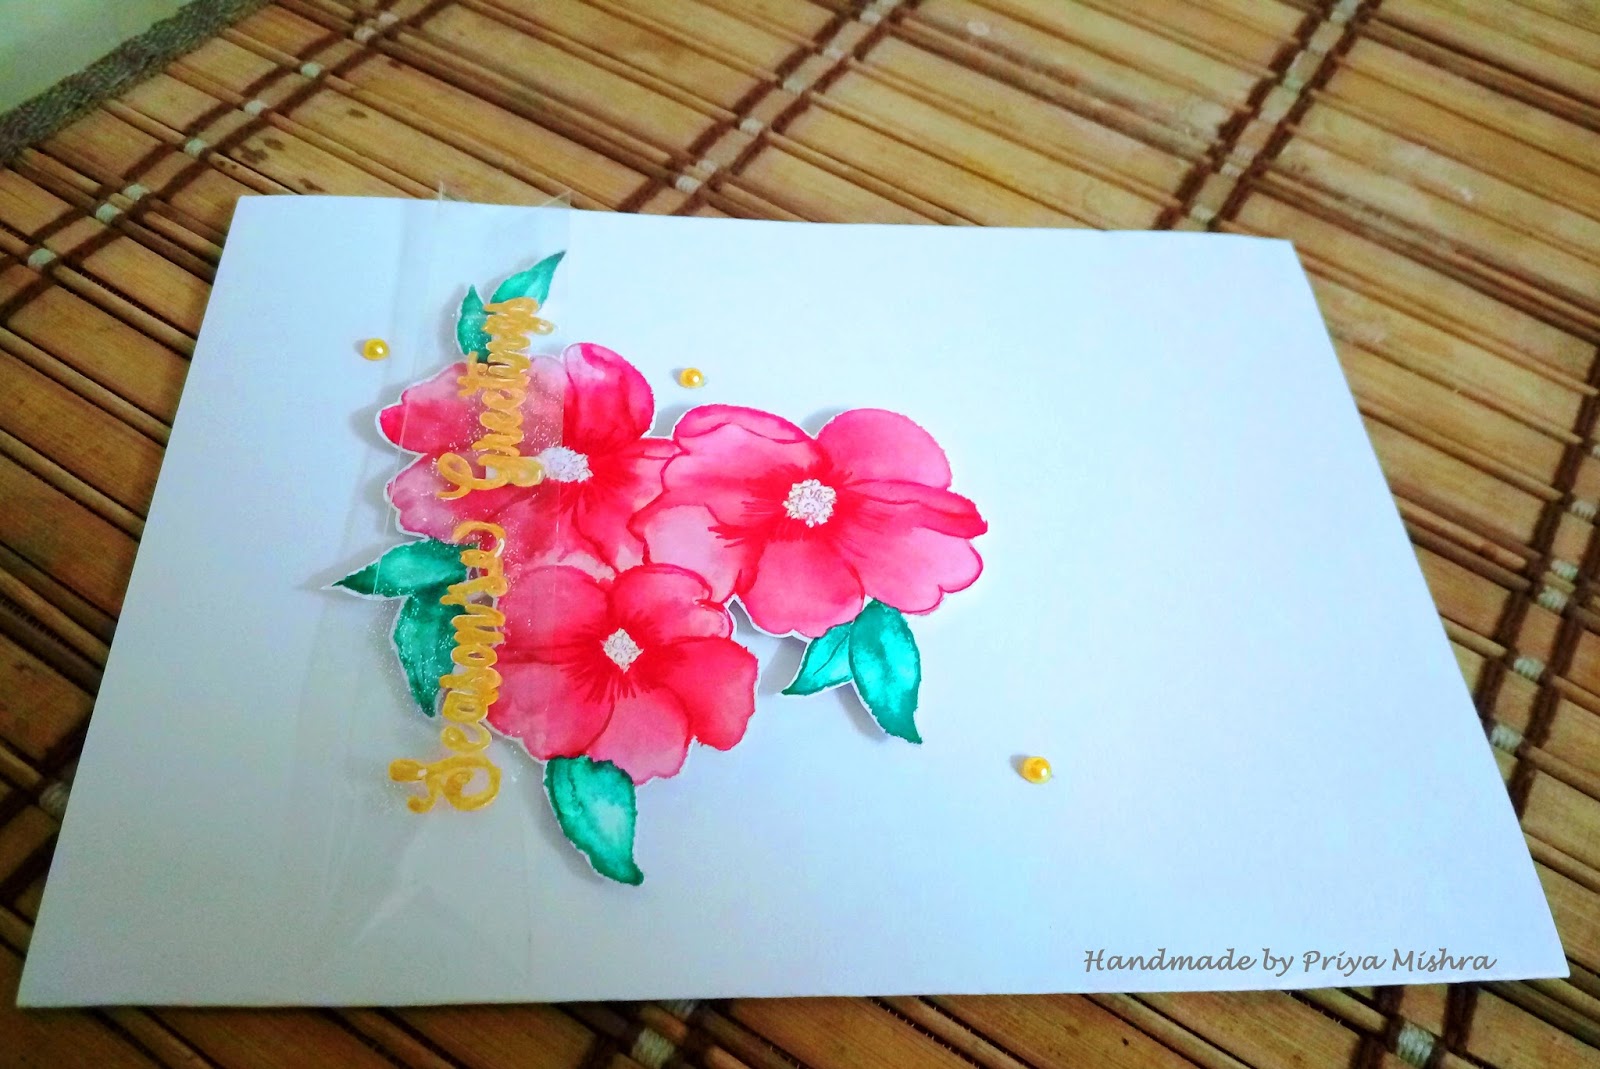
Water colored the images using Distress ink. Then handcut the images and stuck on the cardstock using foam tape to give it a height. Heat embossed the sentiment on vellum and placed on the images.


Finally added a few drops of blue, ink and white rhinestones to complete it.
Took pictures from two different angles. Kept the card Clean and Simple.


Supplies Used:
Mudra Craft Stamps (Christmas Decors, Christmas)
Ranger's Embossing powder and Distress Ink
Versamark Clear Ink
Rhinestones
White card-stock

I would like to enter the following challenges:

( Used Heat Embossing on Vellum and Water color Sprtiz)


Thanks for visiting...
Hugs,


Thursday, December 29, 2016

A Simple CAS Card

Hello Everyone...
Today I'm sharing a Clean and Simple card which I made keeping in mind some challenges I wanted to enter.
Here is what I made...


It is a 5.5"*6" card. 
After stamping the images, i colored and hand cut it to stick on the card. Used foam tape to give it a height. As I wanted to use Gold color in the card I wrote the sentiment using golden color on transparent sheet. Finally used golden pearls to complete it.


Things Used: 
Blank Card
Mudra Linen Bloom Stamp
Faber castle water color pen
Pearl
Vellum
Gold color

I would like to enter the following Challenges:


( I used Masking and water color Sprtiz)


Wednesday, December 28, 2016

Layout : Hello

Hi Friends,

Today I'm going to share a layout with warm colors. Winter is my favorite season and I love vibrant colors too. 
I bought this paper pack few weeks back and wanted to make a LO using it and here it comes...


This is 12"*12" LO. I have layered the papers from two different packs and used distress ink on the inside edges of the bg. For the photo mat I layered two different papers and used two different shades of distress ink on the edges.
For stenciling I used Mudra stencil and applied texture paste randomly and colored them with distress ink and water color. Then I wrapped a string of jute cord around it.Sprinkled a bit of gesso on the whole sheet ( hope u can see the random small drops). Then decorated with lace, butterfly stckers and a few flowers. Finally I added a small chippie on the upper side of the picture and a chippie sentiment "Hello"to complete the look.

Products Used:
1.Pattern Paper from Papericious
2.Chippies from Papericious
3. Lace from Papericious
4.Stencil From Mudra
5. Ranger Distress Ink
6. Butterfly 3D Stickers
7. Flowers

I would like to enter the following challanges


( I'm inspired by the papers and colors in the mood board)

2. PDE Linky party:ch-152

3. Modsquadchallenge Warm-and-toasty-come-in-from-cold
 ( I used Warm colors in my Layout)

4. lilpatchofcraftyfriends; challenge-48

5. Stamplorations stencil-sunday-december Challenge


Thank you for visiting
Hugs,
Priya


Friday, December 16, 2016

Quilled Lord Jagannath

Hello Friends,
Today I am very happy sharing my DT project for Indian Quilling Challenge. This month the theme is "Favorite Technique".

I have a lot of favorite technique in Quilling. I love 3D, I love beehive, comb technique and tight quilling. But my most favorite is "Line Quilling". In this technique u can make most intricate designs. It looks so beautiful. When this theme came up, I was very sure to make something on this as I have not made many projects using this technique.

Though this looks very beautiful, It takes a lot of time and requires patience to align this small papers on ur desired designs. If u r new to this technique, do try with 10mm strips. These are bigger in width and are easy to handle as compared to 5mm or 3mm. But as I'll frame this particular one for my wall, I used 3mm strips here.

I hand drawn the picture that I wanted to quill. It was my long time wish to quill Lord Jagannath. Jagannath temple, which is one of the "Chaar Dhaam"is in the holy town Puri which is situated in "Odisha", the eastern state of India. So take a look...

Coming on to the project, First I made the face of the Lord which is circular. Then I tried to add the conch, the lotus and the Sudarshan Chakra around his face. Jagannth ji has big circular eyes that i have made here. For the face I used black, white and red paint to make the base on paper and then using 3mm quilling strips I made the outline and all the other designs here.
Lord Jagannath holds Sudarshan Chakra and Conch in both his hands and wears a lotus shaped crown on his head. As I was only making his face, I added all the symbols around him. Made 3 little snow flakes to decorate the surface. This is a wall frame and will be hanging on my wall shortly.


I tried a bit of embossing here. You can see the clear embossing under the 3 snow flakes. 
That's all for today.
If you like my work leave some love in the comments below.
Hugs,


Tuesday, November 29, 2016

A Quilled Fairy Garden

Hello Friends,

I'm back with another quilling project. It is quite an amazing experience making each part of it.
Take a look.


For this I took a chocolate box as the base. It is a cardboard box. I filled it with thermocol and cut a circular part for making the space for the pool. I colored the base grey to get a nice raw stone effect. Then I cut a plastic bottle and painted blue from outside to make it a pool. Once the base is done, I make the house with cardboard. I am planning to make a tutorial on how I made the house. If I do, then will definitely post it. Once the house is done I painted it and placed at the desired place. Then I placed a stone to show as a rock in the garden.

Then I made the tree beside the house. Once I completed it, I covered the trunk part with brown tape to give an older effect. Then I made these flower pots and glued them. Then made the bushes and the grass. Placed a snail on the grass beside the rock.  Placed sea shells around the pool to create a magical effect and also put them as stepping stones.

I used Pop Sticks to make the fence by simply gluing them.
Some closer look of my garden...

The Gate, the rock and snail on the grass

The Pool


This is my DT project for Indian Quilling Challenge for November.
If my work inspires you, leave some love in comments below.
Thank you for visiting,

Priya


Thursday, November 17, 2016

Art Journal #18

Hello Friends,

This month my son will celebrate his birthday.
 As I was making his spider man photo booth and other small essentials he demanded, I thought of making a journal page for him.
Though he likes to interfere in all my art works as he loves coloring so much, this time he calmly enjoyed as what Mommy is making for him. He advised me here n there also.

So, let's take a look


First I applied gesso on the page and let it completely dry. Then some random stamping here n there. Then I painted the entire surface with acrylic paint. I mixed water to get a lighter shade and then cut some paper to make an uneven banner. I stamped the letters individually and then cut and glued on the banner. 
Next i stamped the small hearts and Butterflies, colored and hand cut them, then glued on the page.
The emotions are also stamped and glued to finish up the look.

If my works inspire u leave some love in comments below.


Every child is SPECIAL to their parents. I made this page for my son.
These strips and banners and the flower are from an OLD magazine, I used my NEW butterfly stamps, and painted the entire page BLUE.

Hugs,


Tuesday, November 15, 2016

Butterfly Cards

Hi Friends...
Today I'm here to share two cards which I made using the same stamp sets.
Right now I'm trying my hands on different techniques of card making and the first one here is a kind of experiment. But I'm happy with the outcome though I wasn't quite sure when I started making it.

Here is it...

Now to the technique...
I first stamped the butterfly stamp using Versamark clear stamp and then started the coloring once it was dried. No embossing at all. Just the coloring and yes all the butterflies were clearly visible. I forgot to take a picture of the process while making this one. Sharing another stamped card with the same technique.
Here is the card right after stamping...


So, as you can see the butterflies here...
I started coloring on it and then after I colored the entire card I used fabrecastle watercolor sketch pens for the shading of the butterflies. Then I sprayed some shimmer on the card using a paint brush. Hope it is visible in the photo. After adding the stamped sentiment from Pennyblack I added a few sequins to complete the look.

Now coming on to my next card.
Here also I tried to create a background with the stamps.
I used Beautiful butterfly and leafy stamp from Mudra again with distress ink. Water-colored the butterflies and then added a hand cut stamped butterfly on the sentiment.
Here is the card...


I love the bright colors of the cards.
If u like my work leave some some in comments below.

I would like to enter the following challenges:


Hugs,


Monday, October 24, 2016

Two Cards

Hello Folks,

Today I'm sharing two cards.
I'm very very interested in using stamps and watercolors in card making.
But I am not that comfortable in coloring stamps.
Here, I tried to create something nice and clean. I used stamps and tried water coloring for the first time in cards.

The first one with my newly own leafy stamp set from Mudra.
I used Ranger Distress inks and a sentiment stamp from Penny Black.
It is simple 4"*4" card.
Take a look.


The next card is also a simple 6"*4.5" card. I have used Beautiful butterfly stamp set from Mudra here for both the butterflies and sentiment.
I have used distress ink to color both the cards. Here I added some stones here and there to complete the look.


I'm really loving this butterfly stamp set and making a few more cards in the same line.
If u like my work, do follow my blog and leave some love in comments.

Hugs,


Thursday, October 13, 2016

Quilling Masquerade

Hello Friends...

I'm back today with this months IQCG DT post.
This month the theme is Bingo. We have to choose any one line from the below box and create something unique. Her's the grid..

I have chosen the diagonal line Wings-Flowers-Lilac. 
As this is a party season, I wanted to make something trendy as well as wearable. Me and my son both love wearing different kinds of masks, so I decided to make one which is on a softer side and both of can wear it for upcoming parties.
I made a Masquerade with one wing of a butterfly and some flowers on it. Only two shades of Lilac is used here. I tried to keep it simple. Take a look..


First I cut a mask of a cardboard according to the desired size and glued colored paper on it. 
After cutting the eyes I tied the band on the back side. Then I started quilling on it. I choose a darker shade of paper to give a contrast look. Firstly I made small tight coils around the upper half of the eyes, then made the outline of the Wing. I filled the wing with beehive quilling technique. Normally I love to use beehive but this time it was a bit tricky as I had to adjust the height and make it stronger (as u can see the mask is bent towards the sides).

Another close look at the mask...


After the wings are filled, I made the flowers, some swirls and glued them on it.
It's perfect fit for a Masked party and very comfortable. My son enjoyed wearing it and now he wants some more in different colors and styles. 

I thoroughly enjoyed making this. Hope u like it too, if yes, do leave some love below. 
To participate in IQCG#31 link your entry HERE

Hugs,


Thursday, September 29, 2016

Love: Layout

Hello Friends,

Today I'm so happy to share another Layout.


Here I used Light Pink, Red and White mostly to keep it minimum. It was not deliberate and I really wanted to make it heavy. But I like the way it came out. I hope u like it too.
The size of the LO is 8"*10"

I glued the upper layer on the background striped Paper and created the layered photo mat. Crumpled the upper background paper from sides and distressed it.


Stamped the LO and arranged the embellishments- Used a doily, hand cut the roses, Stamped a sentiment "Love" and added the hand cut pink and red hearts.

Supplies:
Paper pack from Papericious
Penny Black Stitches Stamp
Brushed Alphabet Stamp set from Mudra Stamps
Sugar Spun Distress Ink
Black Soot Distress Ink
Foam Tape
Tacky tape

I would like to enter the following Challenges:


( Mood board inspiration: White Background, Red and pink hearts, Sentiment, Crumpled and striped Paper, Flowers)


If you like my creation drop some love in comments.
Hugs,


Wednesday, September 7, 2016

Little Mermaid

Hello Friends...
A very good morning to all.
Today I'm going to share a quilled 3D project which is also my DT post for the month of September at Indian Quilling Challenge.

The theme being under the sea, there could not be a better option than a cute little mermaid.
So, take a look..


Do participate in the challenge here


Thanks for visiting my blog.
Hugs


Tuesday, August 30, 2016

Friendship Shaker Card

Hello Crafters...

Today I am going to share a card.
This is the first time I have tried my hands on shaker as well as CAS card.
 This is my card.

It is a very simple card. I used a printed sentiment and tore it to stick on another white base. used distress ink on the edges to highlight the out line. 
The leaves are also printed and hand cut. 


Added stars, hearts and circles as shakers.

I want to enter the following challenges :


Thanks.


Thursday, August 18, 2016

Explosion Box # 3

Hello Friends...

Today I'm sharing another explosion box.
These are fun to make and there is so much scope for alteration every time you make one. I have made a couple of these and you can find them here and here.

This one I made for my brother on the special occasion of Rakhsabandahan. I kept it simple as he doesn't like much layering and bling. So this has just one layer and all the sides open up as u take off the lid. Inside I have kept a box for the rakhi n gift. 

This is how it looks...


As u can see I have decorated the outer layer of the box with texture paste and the stencil used here is flourish from Tim Holtz ( the same I used for my last two projects). I just love this stencil. Loved how it came out on this beautiful paper. It is the home made texture paste.

The Lid


I layered the lid with two different patterned papers from the same paper pack and made one blank tag on which I placed this rose. The other tag is a printed one, which I colored a bit.

Some inside views now...


I used some emotions and tags to decorate the inside of the box. The lid of the inner box was layered with doily, mdf cutout, a stamped tag and a similar Rose.

Supplies:
1 sheet of 12"*12"white plain card stock
2 different sheets of 12"*12" patterned paper from Violet script Paper pack from Papericious
Stamp from Penny black
3d tag
printed emotions
Glue 
double sided tape
Tacky tape
n the embellishments

I am not sharing a tutorial here as a lot of tutorial are already available online.
Thanks for dropping by. 
Please leave a comment and follow my blog if you like my projects.

Hugs


Wednesday, August 10, 2016

National Flag

Good Morning Friends...

Today I am here to share a work which is really close to my heart.

On August 15, 1947, India woke up to freedom. Decades have passed since, we continue to celebrate this day when we became a free and sovereign nation. 
I am extremely proud to be an Indian because I was born here. India is a vibrant country where you will find innumerable differences co-existing. Its myriad cultures has been an amalgamation of various civilizations. I love India and I have no reasons for it. It's just a feeling and every time I see the national flag I admire it, every time i hear the national anthem i get up naturally. 

I am extremely delighted that I got a chance to make something on India and I have never done anything patriotic before. This is such a beautiful concept this time at  IQCG.

I have quilled an outline of our National Flag.
Take a look...


I took this wallpaper design from google as an inspiration to quill on.
I hand drawn the outline and colored the required spaces with acrylic colors. Then I glued the 3 mm quilling strips on the outlines and some to the insides also.
It was really painful for my weak eyes to make those tiny patches... but i really loved the outcome.

Thanks for visiting. Please leave a comment if you like / dislike my work.

Hugs